

Aluminum Foil Sealing Machine Solutions for Efficient Filling
2026-11-02
Think you’ve maxed out your filling line? The real bottleneck often isn’t the filler—it’s the seal. A weak or inconsistent foil seal can lead to leaks, spoilage, and costly returns. In this post, we break down how modern aluminum foil sealing machines solve the efficiency puzzle, and why Wanying Machinery has become a go-to partner for producers who refuse to choose between speed and reliability.
Matching Foil Liners to Container Materials and Neck Finishes
Choosing a foil liner that actually seals depends less on the liner's thickness than on the container material you're working with. Glass jars with continuous thread finishes tend to give the most forgiving bond, especially when the land area is wide and flat enough for induction heating to transfer cleanly. Plastic bottles are trickier: polypropylene and polyethylene have low surface energy, so untreated necks often cause the foil to peel right off after cooling. A flame or corona treatment on the neck, or specifying a liner with a heat-seal coating matched to the polymer, makes a measurable difference.
Neck finish geometry matters just as much. Look at the sealing surface, not the thread style. Wide-mouth finishes with a smooth, uninterrupted land allow the foil to sit evenly under the cap torque. Conversely, deep lug finishes or neck designs with recessed panels create uneven pressure, which leaves channels for air or liquid to bypass the seal. For metal containers, the liner usually bonds well to epoxy or vinyl coatings, but watch for oil or lubricant residue from the neck forming process—wiping or plasma cleaning before capping prevents weak spots.
Don't assume the same liner works across your entire line. A foil that seals perfectly on a PET jar with a 38-400 finish may fail on a polypropylene bottle with a 28-410 finish, even with the same cap style. Run a simple torque-and-leak test at your filling temperature and after a 24-hour cool-down. If you notice uneven edge lifting, the issue is almost always a mismatch between liner coating, container neck material, or the flatness of the land area—not the induction power alone.
Dialing in Seal Temperature, Dwell Time, and Pressure
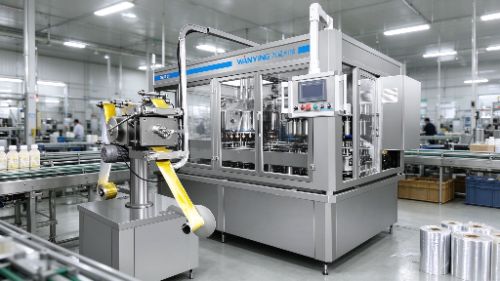
Nailing the right seal temperature is less about chasing a magic number and more about reading how your material actually behaves under heat. Start slightly below the spec sheet's midpoint, then bump it up in small increments until the seal line turns glossy but not dripping. If the film puckers or shrinks back from the jaw, you're too hot; if the seal peels apart with little resistance, you're still too cold. A quick tear test after each adjustment will tell you more than any preset dial ever will.
Dwell time often gets treated as an afterthought, but it's the quiet variable that makes or breaks consistency on a busy line. Too short and the adhesive layer never fully activates, leaving weak spots that fail once the package is dropped or squeezed. Too long and you're not just wasting cycle time—you're risking heat damage to thin gauge films and creating brittle seals that crack under flex. Find the shortest dwell that still gives a full, even seal across the entire jaw width, then lock it in and resist the urge to fiddle.
Pressure is the third leg of the stool, and it's the one most operators set by feel rather than fact. Crank it down too hard and you'll squeeze molten polymer out of the bond area, leaving a thin, starved seal that looks fine but tears under load. Back it off too much and you'll get gaps and channels where air or moisture can sneak through. Use a pressure indicator film or a simple footprint test to map the actual force distribution across the jaw face—chances are it's uneven in ways you'd never notice from the outside. A few shims or a jaw realignment can turn a mediocre seal into a repeatable, hermetic one.
Quick-Change Sealing Heads for Multi-Product Filling Lines
Swapping seal heads between product runs used to mean pulling out wrenches, re-aligning the head, and then running test seals until everything settled. The quick-change versions skip most of that. They use a spring-loaded collar or a quarter-turn lock so the operator can pop one head off and click another into place without touching a single bolt. On a line that runs three or four different bottle sizes in a shift, that alone can save over an hour of downtime.
The real advantage shows up when you are dealing with products that leave residue or need strict separation. Instead of cleaning a head in place and hoping nothing is left behind, you keep a dedicated head for each formula on a nearby rack. The heads are pre-cleaned, dried, and ready to go. When the next product is up, the operator swaps the head and the line starts again. Because the mounting interface is standardized, the seal pressure stays consistent from one head to the next—no need to re-dial the settings every time.
Some plants go further and use color-coded collars or simple RFID tags on each head so the operator can tell at a glance which head belongs to which product. That cuts down on mix-ups during busy changeovers. The heads themselves are usually made from 316 stainless or food-grade polymer with no hidden cavities, so a rinse and wipe is enough between deep cleans. For multi-product filling lines, this kind of quick-change sealing head is less about a single clever feature and more about removing the usual friction from every switchover.
Keeping Up with High-Speed Filling Without Sacrificing Seal Quality
Line speed increases often put the sealing station under the most pressure. Rather than simply raising heat settings and hoping for the best, many lines find better results by looking at how film structure, product temperature, and jaw geometry interact. Preheating the seal area just enough or moving to a film with a wider sealing window can maintain seal strength even as cycle times drop.
At high speeds, waiting until the end of a shift to check seal samples is too late. Sensors that monitor temperature and pressure at each cycle give operators a chance to correct drift before weak seals leave the line. Servo-driven jaws help here as well, holding dwell time in a tight band without slowing down the filler.
Faster filling also accelerates wear on sealing surfaces and cutting edges. Replacing these parts based on cycle count instead of calendar time prevents the gradual drop in seal quality that is often mistaken for a speed problem. Keeping the sealing area clean and properly aligned becomes a bigger part of daily routine, not an afterthought.
Troubleshooting Wrinkled, Partial, or Leaking Foil Seals
Wrinkled foil seals almost always trace back to uneven pressure, a misaligned sealing head, or liner incompatibility with the container finish. Start by checking that your induction sealer head sits level and parallel to the conveyor, then verify the cap torque isn't crushing or shifting the liner before sealing. A quick run with a variety of bottle samples will often reveal whether the issue is limited to one cavity or one lot of caps.
Partial seals usually mean insufficient heat, poor contact, or contamination on the bottle lip. Wipe a few bottle rims dry and remove any product residue, then increase the sealer power in small steps or slow the conveyor slightly. If the foil still won't bond evenly, measure the gap between the sealing head and the cap top, and check whether the liner's backing layer is compatible with your current frequency and wattage.
Leaking after a seal that looks intact can be caused by a false seal, pinholes, or microscopic fractures in the foil from excessive dwell time. Peel back a few sealed liners to inspect the bond pattern, and run a simple squeeze or vacuum decay test on finished containers. Replacing worn pressure pads, adjusting cap torque to the liner manufacturer's spec, and ensuring the bottle finish has no nicks or flash will eliminate most intermittent leaks.
Inline Seal Inspection Methods That Catch Defects Early
Inline seal inspection has moved well beyond basic camera checks. Modern lines now pair high-speed vision with pressure decay or vacuum leak testing right at the sealing station, so a weak crimp or a micro tear gets flagged before the product ever reaches a pallet. The trick is matching the sensor type to the failure mode—optical systems catch surface irregularities, while pneumatic methods find leaks that look perfect to the eye.
One practical approach is to stage the checks. A laser profiler maps the seal contour immediately after forming, and a downstream pressure differential test confirms integrity under stress. By keeping both steps in the line rather than in a lab, operators can correlate dimensional drift with leak rates on the fly and adjust tooling during the same shift instead of after a batch is quarantined.
What makes these inline methods stick is their focus on early signals. For example, thermal imaging can spot uneven heat distribution along a seal just before it cools, giving maintenance a heads-up hours before a full failure shows up in end-of-line testing. That shift from catching rejects to catching causes is where the real savings are.
FAQ
It bonds a foil liner to the rim of a container using electromagnetic induction, creating an airtight seal that prevents leaks and extends shelf life without slowing down the line.
Because the seal forms in under a second after capping, containers can move continuously through the line instead of waiting for adhesive or heat to cure.
Anything sensitive to moisture or oxygen works well—edible oils, dairy, pharmaceuticals, chemicals, and even automotive fluids.
Adjustable power output, a water-cooled sealing head for long shifts, and compatibility with various cap sizes and container materials.
Most modern units come with tool-free changeovers or digital presets, so switching from a 28mm cap to a 38mm cap takes only a minute or two.
Cleaning the sealing head to remove dust or foil debris and checking water coolant levels if it's water-cooled are usually enough; there are no belts or complex moving parts.
No, rectangular and oval containers can also be sealed, though the coil design and conveyor spacing may need to be adjusted for the shape.
A proper seal prevents cap leaks during transport and storage, so fewer products are rejected or returned, and there's less need for extra inner seals or shrink bands.
Conclusion
Modern aluminum foil sealing machines earn their keep when they adapt to the containers and cap liners already in use, rather than forcing a packaging redesign. Getting the foil liner to bond correctly starts with matching the liner's backing material—whether it's pulp board, foam, or a single-piece induction seal—to the container's neck finish and the resin used in the bottle or jar. A liner that sits slightly off-center or has the wrong diameter will not seal evenly, no matter how much heat you apply. Once the liner is matched, operators need to dial in the three variables that determine seal strength: seal temperature, dwell time, and pressure. These are not universal settings; a thick-walled HDPE bottle pulls heat away from the foil faster than a thin PET container, so the dwell time and temperature must be adjusted accordingly. Quick-change sealing heads help when a single filling line handles multiple products—swapping heads in under a minute keeps changeover from becoming a bottleneck. For plants running many SKUs, heads with tool-free adjustments and pre-set recipes for each container size prevent operators from guessing at settings each time.
High-speed filling lines demand a sealing head that can track container movement without losing contact pressure. Any bounce or vibration at the sealing point leads to weak spots along the rim, especially when the line runs above 200 containers per minute. To maintain seal quality, some machines use spring-loaded or air-cushioned pressure pads that follow minor height variations in containers, while others pair the sealer with a vision system that checks every seal immediately after cooling. Wrinkled seals, partial bonds, and leaks usually trace back to three causes: insufficient heat for the liner type, too short a dwell time for the container material, or uneven pressure from a worn sealing head. Troubleshooting starts by isolating one variable at a time—bumping temperature up by a few degrees while keeping dwell and pressure constant often reveals whether the liner is under-cured. Inline inspection methods, such as non-contact thermal imaging or high-speed cameras that detect seal perimeter gaps, catch defects before they leave the filling area. Unlike manual sampling, these systems flag intermittent problems like a dirty sealing surface or a slight misalignment that would otherwise go unnoticed until customers report leaks.
Contact Us
Contact Person: Tyson
Email: [email protected]
Tel/WhatsApp: +8613396971296
Website: https://www.wanyingmachinery.com