

Article Summary: Disassembly is one of the most important maintenance procedures for a gasketed plate heat exchanger used in HVAC systems. When cooling capacity declines, pressure drop increases, or leakage appears, opening the exchanger can provide direct access to the plates, gaskets, and flow channels. However, incorrect disassembly can create new problems, including plate deformation, damaged gaskets, incorrect plate sequencing, uneven tightening, and leakage after restart. This guide explains how to approach the process systematically—from shutdown and isolation to plate marking, inspection, cleaning, gasket replacement, reassembly, and final verification—so maintenance teams can restore heat-transfer performance while reducing avoidable downtime.
Why Disassembly Matters in HVAC Maintenance
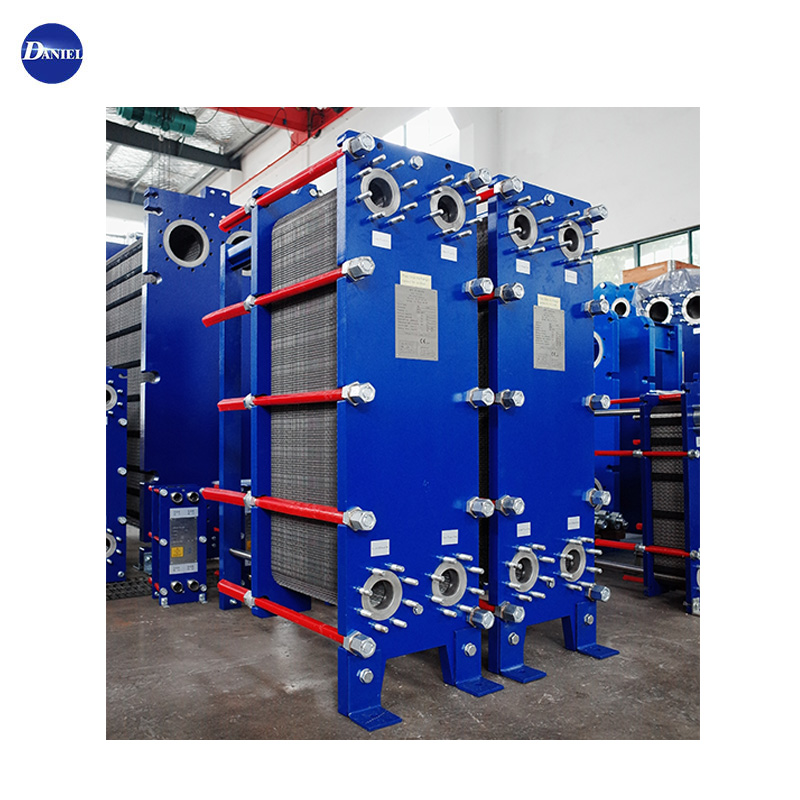
Plate heat exchangers are widely used in HVAC applications because they can transfer heat efficiently within a compact footprint. A gasketed plate heat exchanger consists of a series of corrugated metal plates clamped between a fixed frame plate and a movable pressure plate. The plate pattern creates separate channels for the two fluids, allowing heat to pass through the metal plates without the fluids mixing under normal operating conditions. ASHRAE describes this arrangement as a serviceable design in which the plate pack can be opened for inspection, cleaning, regasketing, and replacement of individual plates.
In an HVAC system, however, the heat exchanger does not operate in a laboratory environment. Chilled water, condenser water, glycol solutions, suspended particles, corrosion products, minerals, and biological deposits can gradually affect the fluid channels. Fouling may increase flow resistance and reduce heat-transfer performance, while deteriorated gaskets can eventually result in external leakage or internal cross-contamination.
This is why disassembly should not be viewed simply as “taking the heat exchanger apart.” It is a controlled maintenance procedure designed to answer several practical questions:
- Are the heat-transfer plates clean and structurally sound?
- Are the channels partially blocked by scale or deposits?
- Are the gaskets still flexible and correctly seated?
- Has corrosion, erosion, pitting, or deformation developed?
- Has the original plate arrangement been maintained?
- Can the exchanger return to its intended thermal and hydraulic performance after service?
Important distinction: This article focuses primarily on gasketed, mechanically assembled plate heat exchangers. Brazed plate heat exchangers cannot normally be opened in the same way, while welded designs have their own service limitations. Always follow the specific manufacturer's maintenance instructions for the model being serviced.
What to Check Before Opening the Heat Exchanger
The safest disassembly begins before the first bolt is loosened. Maintenance personnel should understand the operating condition of the HVAC system and establish a controlled isolation procedure.
1. Confirm the maintenance symptoms
Look at operating records before deciding to open the exchanger. A rising differential pressure, declining temperature approach, insufficient cooling or heating capacity, abnormal flow conditions, or visible leakage can help identify the probable cause. ASHRAE recommends recording operating conditions such as temperatures, pressures, and pressure differentials because these records help establish normal operating behavior and support troubleshooting.
2. Shut down, isolate, depressurize and drain
The exchanger must be isolated from the HVAC circuit before opening. Both fluid sides should be properly shut off, depressurized, and drained according to the site's safety procedures. The exchanger should also be allowed to reach a safe handling temperature.
Never open a pressurized or excessively hot plate heat exchanger. Stored pressure, hot water, glycol solution, steam, or chemical cleaning fluid can cause serious injury. Lockout/tagout and site-specific safety procedures should be followed by qualified personnel.
3. Allow enough service clearance
One of the advantages of a gasketed plate heat exchanger is that the movable pressure plate can be moved along the carrying bar to expose the plate pack. But the installation must provide sufficient clearance for that movement and for removing individual plates. ASHRAE specifically notes the importance of providing adequate maintenance clearance around heat exchangers.
Tools, Records and Preparation
A well-organized maintenance job is much easier to complete correctly. The exact tools vary according to exchanger size and manufacturer, but a typical service operation may require:
| Item | Purpose |
|---|---|
| Protective gloves and PPE | Protect personnel from sharp plate edges, residual fluids and cleaning materials. |
| Correct wrenching tools | Loosen and tighten frame/tie bolts according to the manufacturer's procedure. |
| Permanent marker | Mark the plate pack so the original sequence and orientation can be restored. |
| Measuring device | Record the compressed plate-pack dimension before disassembly. |
| Soft brush and suitable cleaning equipment | Remove deposits without unnecessarily damaging the plate surface. |
| Replacement gaskets | Restore reliable sealing where existing gaskets are worn or damaged. |
| Inspection records | Document plate condition, gasket condition, cleaning results and final dimensions. |
Before removing the first plate, record the exchanger model, serial information, operating condition, plate-pack measurement, and any relevant maintenance observations. Manufacturers commonly recommend marking the plate assembly and recording the compressed dimension before opening the unit.
How the Disassembly Process Works
The exact bolt arrangement and tightening procedure depend on the heat exchanger model, but the general maintenance sequence is consistent across many gasketed plate-and-frame designs.
Prepare the isolated exchanger
Confirm that the heat exchanger has been shut down, isolated, drained and depressurized. Disconnect piping or connections that would prevent the movable pressure plate from sliding backward.
Inspect the frame and carrying bar
Before opening the plate pack, inspect the carrying bar, guide bar, frame plates and visible fasteners. Clean the sliding surfaces where appropriate so the pressure plate can move smoothly.
Mark the plate pack
Draw a clear diagonal reference line across the outside edge of the assembled plates. This simple step provides a visual reference for the original orientation. Some manufacturers also recommend numbering plates when individual plates are removed.
Record the original compression dimension
Measure and document the plate-pack dimension specified by the manufacturer. Do not assume that a generic dimension is correct for every model. The original measurement is an important reference during reassembly.
Loosen the tie bolts gradually
Follow the manufacturer's specified bolt sequence. Bolts should generally be loosened progressively and in a balanced pattern rather than removing one side completely while leaving the opposite side tightly compressed. The purpose is to release the plate-pack compression in a controlled manner.
Move the pressure plate
Once the manufacturer's opening procedure has been completed, slide the movable pressure plate along the carrying bar to create access to the plates. Avoid forcing the plate if it binds; investigate the cause instead.
Remove plates carefully
Remove plates one at a time when possible, preserving their sequence and orientation. Plate edges can be sharp, and improper handling may bend the plate or damage the hanger area. Manufacturer maintenance guidance recommends careful handling and recording plate positions during removal.
The most valuable habit during disassembly: Never rely on memory for plate arrangement. Mark, photograph and document the sequence before making changes. The plate pattern determines the flow arrangement, so incorrect orientation can affect performance after reassembly.
How to Inspect and Clean the Plates
Once the plate pack is open, the maintenance team has a rare opportunity to inspect the actual condition of the heat-transfer surfaces. Cleaning should remove deposits without unnecessarily damaging the plate material, corrugation or gasket groove.
Look for these conditions
- Scale: Hard mineral deposits can restrict channels and increase thermal resistance.
- Biological deposits: Slime or biofilm may occur in water systems under suitable conditions.
- Corrosion or pitting: Localized damage can compromise plate integrity.
- Erosion: High-velocity flow or aggressive fluid conditions can affect plate surfaces.
- Deformation: Bent corrugations may alter the intended flow path.
- Gasket-groove contamination: Residue in the sealing area can prevent proper gasket seating.
ASHRAE distinguishes between different types of water-system deposits, including scale, fouling, corrosion products and biological fouling. Identifying the deposit type matters because the appropriate prevention and cleaning approach depends on its composition.
For routine mechanical cleaning, use methods compatible with the plate material and manufacturer's recommendations. A soft brush and controlled water cleaning may be appropriate for certain deposits. Avoid aggressive tools that can scratch stainless-steel surfaces or damage the gasket seating area. Manufacturer guidance specifically emphasizes removing residue from gasket sealing lines before reassembly.
Cleaning chemistry matters: Chemical cleaning should never be selected solely because it removes scale effectively. Compatibility with the plate alloy, gasket elastomer, fluid circuit and operating temperature must also be considered. Use the exchanger manufacturer's approved cleaning recommendations or obtain technical confirmation before applying an unfamiliar chemical.
Gasket Inspection and Replacement
Gaskets are one of the most important components in a gasketed plate heat exchanger. They seal the fluid channels and help maintain separation between the two circuits. A plate can be clean and undamaged yet still leak if the gasket is incorrectly positioned, deteriorated or contaminated.
Inspect each gasket for hardening, cracking, swelling, deformation, cuts, loss of elasticity, separation from the groove, or chemical attack. Also inspect the gasket groove and sealing surface for dirt or remaining deposits.
When a gasket requires replacement, use the correct specification for the exchanger and fluid service. Do not select a replacement simply because it has the same general dimensions. Elastomer compatibility depends on fluid type, concentration, temperature and operating conditions.
| Inspection point | What to look for | Recommended response |
|---|---|---|
| Gasket body | Cracks, hardening, swelling or deformation | Replace if condition is outside manufacturer limits |
| Gasket groove | Scale, dirt, adhesive residue or damage | Clean carefully and inspect before installation |
| Plate sealing area | Scratches, corrosion or foreign material | Assess condition before reassembly |
| Gasket positioning | Incorrect seating or displaced sections | Correct according to the manufacturer's installation procedure |
After disassembly, some manufacturers recommend installing new gaskets rather than automatically reusing old ones, especially when the existing gaskets have been removed or show signs of deterioration.
Reassembly Without Creating New Leaks
Cleaning the exchanger is only half the job. Many maintenance problems occur during reassembly because the plate sequence, gasket position, frame alignment or compression dimension is not restored correctly.
Restore the original plate arrangement
Return each plate to its documented position and orientation. The corrugation pattern is not decorative—it forms the hydraulic channels and supports heat transfer. If the plate arrangement is changed accidentally, the fluid path can change as well.
Keep the frame plates parallel
As the exchanger is compressed, the movable pressure plate should remain aligned with the fixed frame plate. Tightening should follow the manufacturer's specified sequence and should be progressive rather than forcing one area fully closed before another.
Use the manufacturer's compression dimension
The final plate-pack dimension should not be guessed. An exchanger that is compressed incorrectly may experience sealing problems, altered flow channels, or mechanical stress. The original recorded dimension provides an important reference, but the manufacturer's specified limits always take priority.
For this reason, generic online tightening instructions should be treated cautiously. Different plate sizes, frame configurations, gasket designs and manufacturers can have different requirements. A professional maintenance procedure should always use the exchanger's technical documentation.
Testing Before Returning to HVAC Service
Do not assume that a successfully reassembled exchanger is ready for immediate full-load operation. A controlled inspection and commissioning sequence can identify problems before they become expensive system failures.
- Verify that all plates are installed in the correct sequence and orientation.
- Confirm that gaskets are properly seated and that no debris remains in the sealing areas.
- Check that the frame and pressure plate are aligned.
- Verify the final compression dimension against the applicable manufacturer's requirements.
- Reconnect piping and confirm that supports do not place excessive mechanical load on the exchanger connections.
- Follow the applicable pressure or leak-testing procedure for the specific equipment.
- Introduce fluid gradually rather than exposing the exchanger immediately to an uncontrolled pressure or temperature change.
- Inspect connections and the plate perimeter for signs of leakage.
- Compare inlet/outlet temperatures and differential pressure with the previous operating baseline.
Recording the post-maintenance operating condition is valuable. If pressure drop, flow or temperature performance changes unexpectedly after service, the maintenance record can help determine whether the issue is related to fouling, flow distribution, plate arrangement, gasket condition, or another HVAC system component.
Preventive Maintenance for Longer Service Life
Disassembly should not be the first maintenance action every time performance changes. A preventive approach can help identify developing problems earlier and reduce unnecessary opening of the exchanger.
| Maintenance activity | What to monitor | Why it matters |
|---|---|---|
| Routine visual inspection | External leakage, corrosion, frame condition | Identifies visible mechanical problems early |
| Temperature monitoring | Inlet/outlet temperatures and approach temperature | Helps identify declining thermal performance |
| Differential pressure monitoring | Pressure drop across each fluid circuit | Can indicate fouling, blockage or flow changes |
| Water-quality management | Scale-forming minerals, corrosion and biological fouling | Reduces the conditions that contribute to deposits |
| Periodic cleaning assessment | Actual operating trend rather than calendar date alone | Helps avoid both excessive and insufficient maintenance |
There is no single universal interval that applies to every HVAC plate heat exchanger. Cleaning frequency depends on fluid quality, system design, operating conditions and fouling tendency. ASHRAE notes that water-side fouling is influenced by the characteristics of the fluid and the operating conditions, while manufacturers generally recommend using equipment-specific maintenance instructions.
A better maintenance strategy is therefore to establish a clean operating baseline and monitor how the exchanger changes over time. A meaningful increase in pressure drop or a measurable deterioration in thermal performance can provide a stronger maintenance signal than an arbitrary calendar interval.
Common Disassembly Mistakes to Avoid
1. Opening the exchanger before complete isolation
Residual pressure or temperature can turn a routine maintenance operation into a serious safety incident.
2. Removing plates without marking them
Once the plate pack is separated, it can be surprisingly easy to lose the original sequence. Marking and photographing the assembly before removal dramatically reduces this risk.
3. Using aggressive cleaning tools
Scratching or deforming the plate surface may create a bigger problem than the original deposit. Cleaning should remove contamination without damaging the heat-transfer surface or gasket groove.
4. Reusing damaged gaskets
An old gasket that appears acceptable visually may have lost its elasticity. Reuse should be based on the manufacturer's recommendations and the actual gasket condition.
5. Guessing the final compression dimension
Do not rely on a generic “tighten until it looks right” approach. The correct compressed dimension and bolt procedure are model-specific.
6. Ignoring the root cause
If an exchanger repeatedly fouls, simply cleaning it may not solve the underlying issue. Water treatment, filtration, flow velocity, system contamination, operating temperature and material compatibility may all deserve investigation.
Frequently Asked Questions
Can every plate heat exchanger be disassembled?
No. Gasketed plate-and-frame heat exchangers are designed to be opened for service, while brazed plate heat exchangers are permanently joined and generally cannot be disassembled in the same manner. Welded and semi-welded designs also have different service procedures.
How do I know when an HVAC plate heat exchanger needs cleaning?
Common indicators include increasing pressure drop, reduced heating or cooling capacity, abnormal temperature differences, reduced flow, or visible evidence of fouling. Comparing current readings with a clean or previously documented operating baseline is particularly useful.
Should I remove every plate during maintenance?
Not necessarily. The required level of disassembly depends on the maintenance objective, exchanger design and condition. For extensive inspection or manual cleaning, individual plate removal may be appropriate. For other situations, an approved clean-in-place procedure may be sufficient.
Why is plate order important during reassembly?
The plates create the fluid channels and determine the flow arrangement. Incorrect plate orientation or sequence can change the intended flow path and may reduce performance or create sealing problems.
Can old gaskets be reused?
That depends on the gasket condition and the manufacturer's maintenance requirements. If a gasket is cracked, hardened, swollen, deformed or otherwise damaged, replacement is normally appropriate. After extensive disassembly, some manufacturers recommend replacing the gaskets as part of the service procedure.
What should be measured before opening a plate heat exchanger?
The exact measurement depends on the equipment design, but recording the original plate-pack compression dimension is a valuable reference for reassembly. Operating temperatures, pressures and differential pressure should also be documented where practical.
What is the biggest risk during plate heat exchanger reassembly?
There is no single universal risk, but incorrect plate arrangement, damaged or misplaced gaskets, uneven compression and failure to follow the manufacturer's tightening procedure are common sources of post-maintenance leakage or performance problems.
Final Checklist: A Better Way to Approach Plate Heat Exchanger Service
A reliable disassembly project can be summarized as a simple maintenance discipline:
- Record: Document the operating condition before shutdown.
- Isolate: Shut down, isolate, depressurize and drain the equipment safely.
- Mark: Record the plate sequence and orientation before removing plates.
- Measure: Record the original plate-pack compression dimension.
- Inspect: Check plates, gaskets, frame components and sealing surfaces.
- Clean: Use a method compatible with the plate and gasket materials.
- Replace: Install suitable replacement gaskets or damaged plates when required.
- Reassemble: Restore the original plate arrangement and follow the specified tightening procedure.
- Verify: Perform the applicable leak, pressure and operating checks before returning to normal HVAC service.
- Monitor: Compare post-maintenance temperatures, flow and pressure drop with the established baseline.
The real objective of disassembly is not simply to make a plate heat exchanger look clean. The objective is to restore the conditions that allow the exchanger to transfer heat reliably while maintaining proper fluid separation and mechanical integrity. A disciplined procedure can also make future troubleshooting easier because every maintenance activity becomes part of a useful equipment history.
Need Support for Your HVAC Plate Heat Exchanger?
Choosing, maintaining or replacing a plate heat exchanger involves more than comparing plate quantity or connection size. The correct solution depends on the HVAC application, heat-transfer duty, operating temperatures, fluid properties, pressure requirements, materials, gasket compatibility and available maintenance space.
Jiangyin Daniel Cooler Co., Ltd. provides plate heat exchanger solutions for industrial and HVAC applications, with a focus on practical heat-transfer performance and service requirements.
If you are planning a new HVAC heat exchanger installation, troubleshooting an existing unit, or looking for replacement plates, gaskets or a complete plate heat exchanger, contact us with your operating conditions and equipment requirements. Our team can help you evaluate a suitable plate heat exchanger solution for your application.
Contact us today to discuss your HVAC heat-transfer requirements and find a practical solution for your system.